
Forming of Concrete Channel and Sub-Drainage Channel For Oyster™ In-Ground Version
Recessed Channel Dimensions
24” Barrier Channel: Width 35.43” / Depth: 1.97”
36” Barrier Channel: Width 48.82” / Depth: 4.10”
48” Barrier Channel: Width 60.63” / Depth: 4.10”
Before installing the in-ground version of the Oyster™ automatic flood barrier system, a recessed concrete channel must be formed, with an internal water drainage sub-channel that connects to a drain pipe.
This channel is designed to allow both allow the flood panels to sit flush with the surrounding ground surface when not in use. The design of the channel allows water to flow into the sub-channel, then to the lowest point and finally into a 4” drainage pipe, which drains to your municipal drainage/sewer system. Note: A back-flow valve should be placed on the drainage pipe to prevent back-flow occurring from head pressure that may develop in the sewer system during a large flood event.
When a flood occurs, water will enter into the drainage channel and sub-channel, until the water level builds up to a point where water is no longer exiting the drain. Once this occurs, the buoyancy of the flood panels causes them to rise automatically, sealing the opening and preventing floodwaters from entering the protected space.
Top View of Concrete Channel
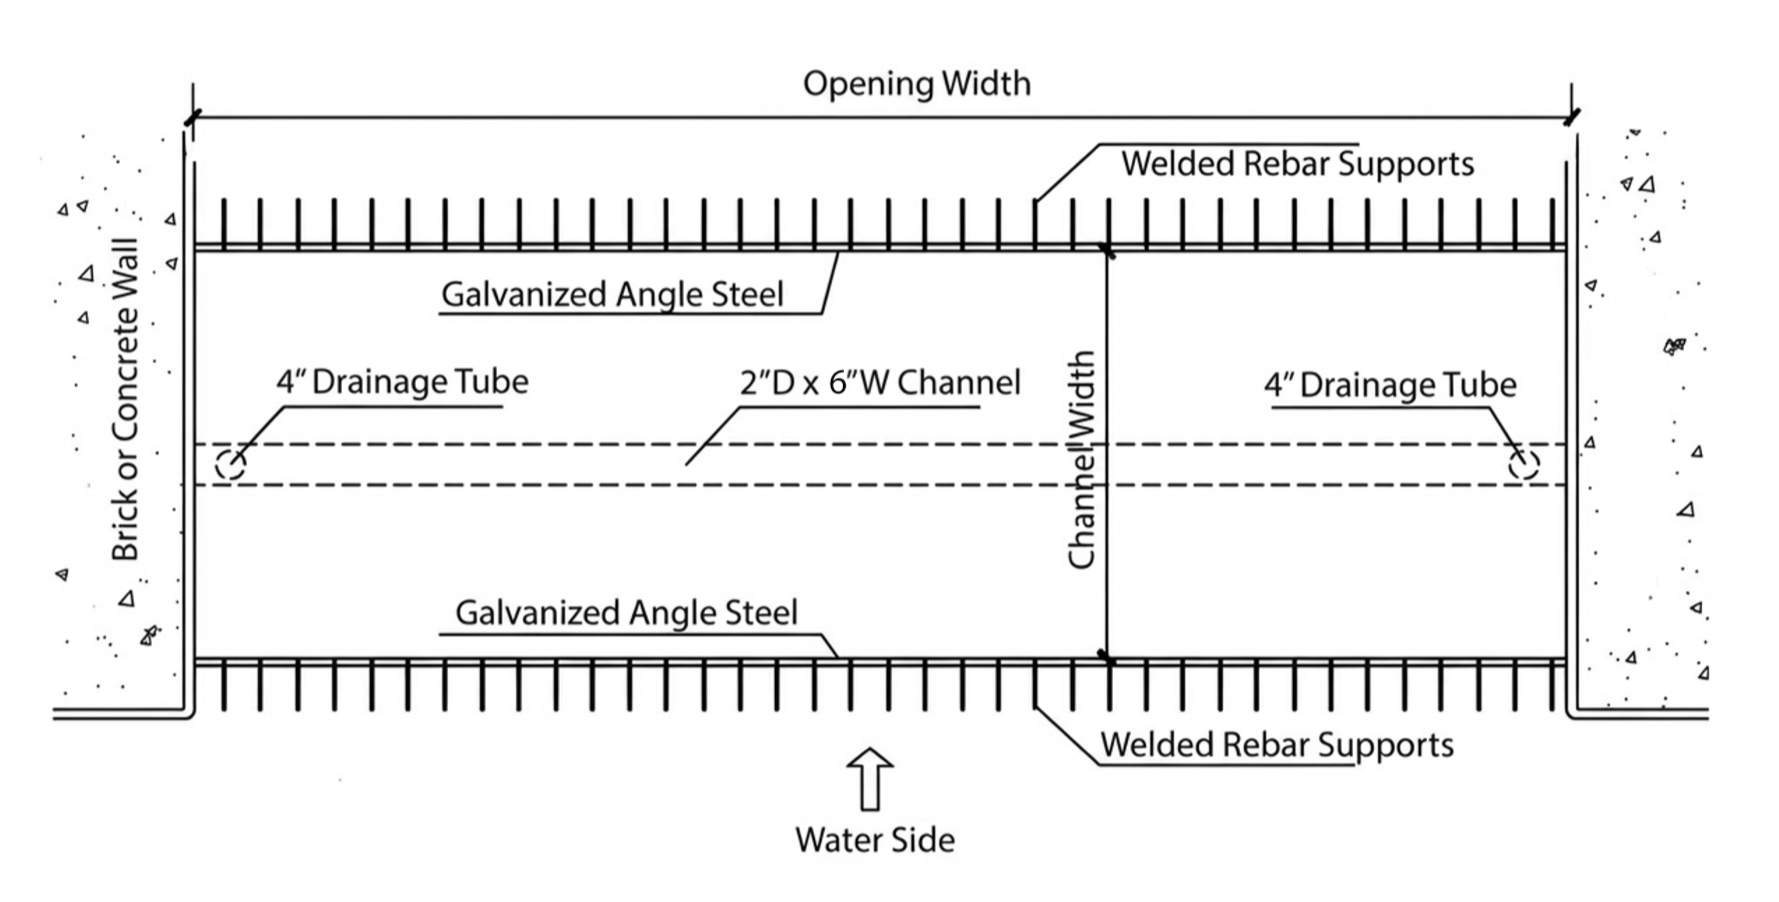
The Oyster drainage channel is formed using C20 concrete and sized and width of the depth of the specific Oyster panels purchased. We recommend reinforcing the edges of the channel with galvanized angle steel, preventing chipping or collapse of the side walls under heavy loads. For further durability, additional rebar supports may be welded to the angle steel to better engage with and embed in the surrounding concrete (see overhead and side views below). For pedestrian use and light commercial applications, it may be possible to use concrete without the angle steel reinforcement on either side of the channel. Consult with your contractor to determine the best option and to decide whether or not to add the steel angle reinforcements.
The drainage sub-channel is formed in the middle of the main channel and should be roughly 2” deep by 6” wide. Drainage tubes should be placed on either end of the opening. We recommend slightly slanting the sub-channel to allow water to flow to the drainage pipes on either side of the opening. The channel should meet a smooth brick or concrete wall on either side (or pony wall) built to the height of flood protection being installed.
Side View of Concrete Channel

When forming the concrete receiver channel for the Oyster flood wall, we recommend a minimum of 12” depth of C20 or stronger concrete. We also recommend 12” or more of concrete on either side of the channel, for additional stability. The 4” drainage pip is embedded into this concrete and should flow to the nearest drain pipe. In the even that there is no nearby municipal drain, a sum pump may be installed below the sub-channel to capture and expel water. Once the sump pump or drainage pipe’s ability to remove water from the channel is overwhelmed the flood wall system will begin to rise due to the rising water levels.
Concrete or brick walls, up to the height of flood protection, are necessary on either side of the opening, in orders to attach the triangular rubber flex seals. These seals allow the flood panels to rise, while staying connected and sealed to the side walls.
For openings where there is a curb, the curb must be replaced by a solid straight wall, built to the height of protection.
Concrete Channel w/Panels Installed
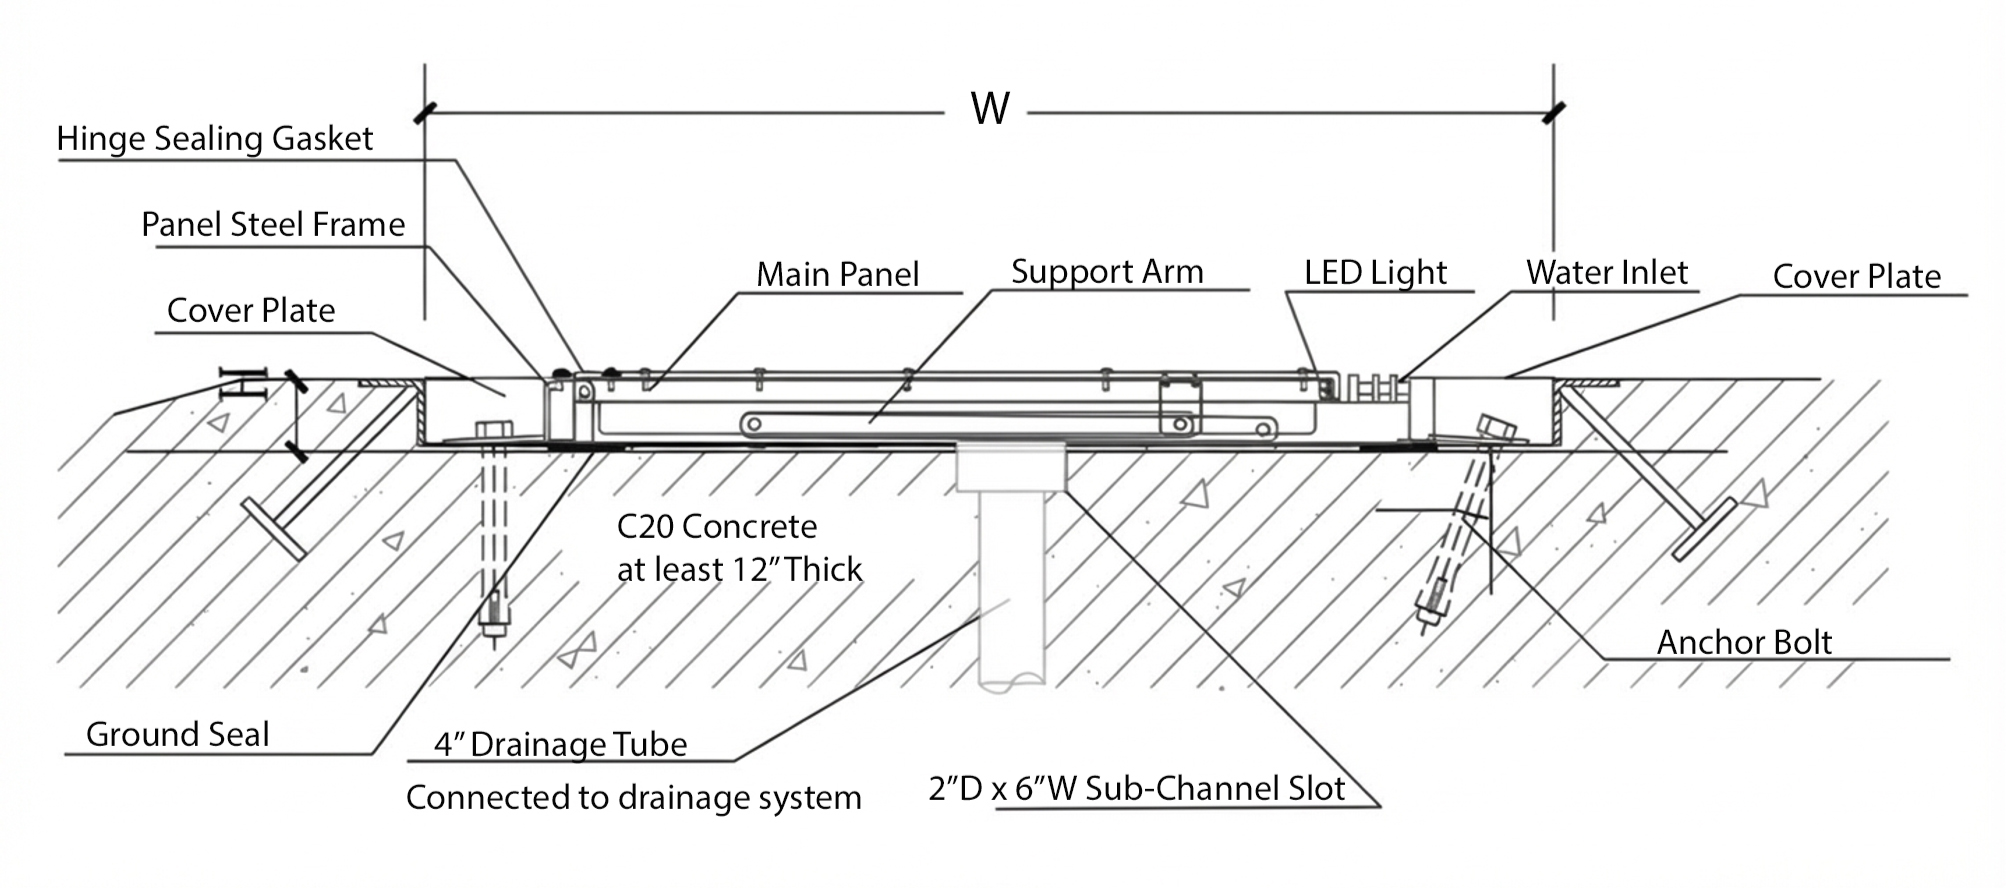
When Oyster flood barriers are installed, the panels lay flush with the concrete channel. Metal casted cover plates cover the anchor points and create a smooth transition between the ground on either side and the recessed flood panels. We recommend periodically cleaning the channel beneath the flood wall by raising the Oyster flood wall into the open position and vacuuming out any debris or dust that may gather below the flood panels over time. We also recommend checking the drainage tubes to make sure they remain unobstructed and free of dirt and debris.
Spacing for Oyster™
When positioning Oyster barrier for installation, it is important to leave 2-4” on either side of the barrier. This allows room for the flexible triangular seals, mounting on either side of the barrier and fastened to the adjacent walls, to flex and permit the panels to rise into the opening position. When ordering an Oyster barrier, please advise the exact opening width. Garrison will adjust the panel length to allow for sufficient spacing between the walls and the self rising flood barrier itself.
